12.13.2013

Christmas Tree Petal Cake Tutorial


Christmas Tree Petal Cake Tutorial

This Christmas themed birthday cake has a number of steps but is not difficult to make.  I suggest making it in stages.  Bake the cake one day and after it cools, "crumb coat" it and let it set overnight.  Decorate it with the petal technique and make the marshmallow Christmas tree the next day.


Christmas Tree cake


Baking the Cake

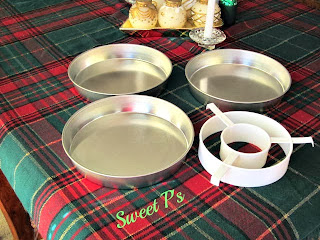
There is a "surprise" inside....  The cake is green and red checks.  I have a set of pans to make checked cakes.  You can probably find them in kitchen gadget stores or Amazon.  Here is a pic of mine along with the contraption that separates the
checkered cake pans
batter:


Any cake batter will work for this cake but you need at least 7 cups of cake batter.  I had 7 cups but 7.5 would be better.  I separated the batter unevenly into 2 bowls - one at 3 cups and one at 4.  You'll see why in a minute.  I colored one bowl red
checkered cake tutorial
and the other green.  Dark colors are hard to achieve without a lot of color.  I used icing gel colors.  To get red, I first colored the batter pink then started adding red.  You usually end up using less color this way.  The more color you have to use, the greater the chance it will change the flavor (and not in a good way).


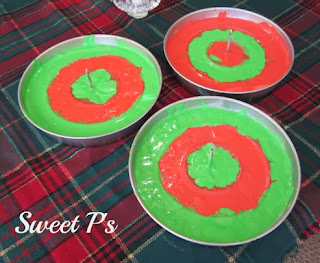
The hardest part of this cake is getting the batter into the right compartments
checkered cake tutorial
without creating a big mess.  I usually use a spoon to help guide the batter where I want it to go.


checkered cake tutorial

One of these things is not like the other...Remember that we separated the batters unevenly?  Here's why.  In my cake, two of the layers use more green than red so I end up using a little more green batter than red batter. Wondering what those pointy things are in the middle of my cake?  Here's an explanation..."Ring Around The Collar" post.

Here's what my cakes looked like when I took them out and turned them onto a
cooling rack:

Stacking

When you put them together, the "odd" one out goes in the middle.  Put them together with icing in between each layer.  Then ice with a "crumb coat" which is a thin later of frosting that keeps the crumbs from showing up on the finished surface of the cake.  (I will share the icing recipe that I used for this cake at the end).  Canned frosting is generally too soft and gooey to use for decorated cakes.  If you don't have these special pans and don't want to purchase them, here's a link to a tutorial for an alternate method: Check cake by carving

Decorating with the Petal Technique

On to decorating...  After the cake has set overnight, I filled 3 disposable icing bags with round tips #12.  One with white frosting, one with red and one with
checkered cake tutorial
green.  You will need lots more white than either red or green.  I decorated this cake using the "Petal" technique.  I use my small offset spatula to do this but you can use a butter knife or the back of a spoon.  You will also need paper towels.  Before I started on the sides, I finished frosting the top and smoothed it out.


The petal technique is a bit time consuming but Very easy and looks great!  Start by piping a vertical row of "dots" or "blobs" starting at the bottom and working up to the top.  The number of blobs you pipe will depend on how tall your cake is.  Once your first row is piped, go back with the spatula and smash them.  You will need to periodically clean your spatula (hence the paper towels) between smashes, especially when moving from one color to another.  Here's a few pics to help you see what I am talking about:
buttercream petal technique


buttercream petal technique

Since I don't do videos, I am putting in a link to a youtube video that shows how easy this technique is:  Petal video


buttercream petal
I decorated this cake mostly in white with a few green and red "petals" for accent but you could do it all in one color or do a little math and create a pattern with the colors.
Here are a few different variations of this design I have done in the past:
buttercream petal


buttercream petal
buttercream petal


Marshmallow Tree Decoration

The Christmas tree decoration on top of the cake is made from an ice cream cone, mini marshmallows, colored sugar, and icing.  I placed the inverted ice cream cone on top of the cake first in order to anchor it as this cake had to travel about 45
Christmas tree cake
minutes.  I then used my white icing in a pastry bag fitted with a star tip (but a small round tip would work) and piped icing onto the cone.  I worked in sections so the icing would not dry before I could get the marshmallows on.  If you just wanted to make the tree decoration without making the cake and icing, you can use ready made icing as the glue to secure the marshmallows.  I suggest using a ready made cookie icing because it will dry harder and faster.


The "branches" are mini marshmallows that have been cut in half (with scissors) diagonally.  When you cut them, the cut side is sticky. You take the sticky side and coat with colored sugar.  Here is a youtube video of this technique: Tree video

The guy in the video made his colored sugar but I already had some on hand.  Next time, I will add some more color to mine to make it darker.  Also, his looks a lot neater than mine.  I lost track of my "rows" at some point.  After I was 2/3 of the
Christmas Tree cake
way done, I realized that it was easier if I flattened the marshmallow just a little (on its side) before I cut it.  I tried shaking them in a bag at first like he does, but I had a problem with mine sticking together so I just put my sugar in a dish and dipped the cut side of the marshmallows in it.


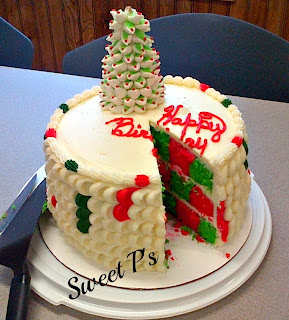
Remember the checked pattern inside?  Well, here is what is looks like when the cake is cut -

Christmas Tree cake

checked cake

Here's the recipe for the icing I used on this cake.  It is Edna De la Cruz's recipe for cream cheese buttercream:

1/2 cup high ratio shortening*
1/2 cup (1 stick) butter - softened
8 oz. full fat cream cheese - softened
2 lbs. powdered sugar - sifted
1 Tbsp vanilla extract
1/2 tsp. salt*

* You can omit the shortening and use all butter or sub out Crisco for high ratio if you can't get high ratio.  It may act a little different without the high ratio.

* I use popcorn salt because it has a much finer grain.

I put the butter and cream cheese in my mixer and mix until blended and smooth, then add the shortening and mix a few more minutes.  I add the powdered sugar (along with the salt) in batches until it is fully incorporated.  Add the vanilla extract and thin with half and half if needed. I usually add a tablespoon of half and half.  You can add water to thin for various decorating techniques.


10.27.2013

Easy Halloween Cake Ideas

Easy Halloween Cake Ideas

Halloween provides lots of inspiration for cake decoration.  I have had the opportunity to make several sheet cakes close to Halloween.  Here are some easy Halloween cake ideas:

Frozen Buttercream Transfer

This one is a not so scary one done for October birthdays at an office.

frozen buttercream transfer


This one is a little bit more on the scary side.

frozen buttercream transfer

Both of the cakes above were decorated using a technique commonly referred to as Frozen Buttercream Transfer (or FBCT).  You can search YouTube for videos of how to do it.  The main thing to remember is to put down that part of the design that will be in the front first.  FBCTs are done from front to back so when you flip it over, the design will be right side up.

I normally work on the FBCT design first and keep it in the freezer while I ice the cake.  I find designs in clip art or coloring books.

Fondant Cut-Out

This next cake was iced in buttercream but the decorations were cut out of fondant.

halloween sheet cake


I started out with a design idea in my head and then found clip art that would work with the design.  I had lots of fun with this design.  The skull, helmet, chin strap, wings, and flames were all cut out separately.  I used an edible food marker to draw the facial features on the skeleton face.  The barbed wire was also made out of fondant.

I admire cake decorators who can truly capture a macabre or twisted design.  Black Cherry Cake Company in the UK is great at these.  Here is their website:


Here's hoping you get lots of treats with no tricks this Halloween!


10.03.2013

Classic Southern Buttermilk Caramel Cake...with a twist

Classic Southern Buttermilk Caramel Cake


caramel cake


Caramel just seems to go with autumn.  Think caramel apples or Halloween caramel candy.  This buttermilk caramel cake is a VERY rich cake!  But oh-so-good.  There are quite a few steps but it really isn't all that hard.  It's perfect for a special occasion.  The traditional caramel cake icing is made partly in a cast iron skillet and is difficult to master.  This version uses a buttercream and easy caramel sauce.

Buttermilk Cake Recipe

The Buttermilk Cake is a Southern Living recipe that I changed up a little bit.  Here is how I made it.  You will need:

1 cup (205 g) hi-ratio shortening *
2 cups (396 g) sugar
4 large eggs (room temp)
2-1/2 cups (300 g) all-purpose flour
1/2 tsp. salt
1/2 tsp. baking powder
1/2 teaspoon baking soda
1-1/2 cups buttermilk (room temp)
2 tsp. vanilla extract

*I get hi-ratio shortening at a cake supply store.  You can use regular vegetable shortening or butter but your results will not be quite the same.

Beat the shortening at medium speed with an electric mixer until fluffy.  Gradually add the sugar, beating well. I generally let this go for 4-5 minutes.  You will notice a definite change in the creaminess of the mixture.

Add the eggs, one at a time, beating until blended after each addition.

Combine the flour, salt, soda and baking powder.  Turn the mixer on low speed.  Add to the shortening mixture - alternating with the buttermilk.  Start with the flour mix (adding 1/3) - then add half of the buttermilk - then another 1/3 of flour- then rest of buttermilk - then rest of flour mix.  Between each addition, let the mixture come together but do not overmix or the cake will be tough.

Stir in the vanilla extract and pour into 3-8 inch pans that have been prepared.  You can either butter and flour them or use parchment paper.

Bake at 350 degrees for 22-25 minutes OR till toothpick comes out clean.  Once done, let cool in pans for 10 minutes then turn out and let cool completely.

It is important that the oven is preheated and that your eggs, buttermilk (and butter if you are subbing out the shortening) are at room temperature.  If you don't have time to bring them to room temp, here is a trick you can use:


Place your buttermilk and eggs in warm water.

Caramel Frosting

For the Caramel Swiss Meringue Buttercream, use your favorite Swiss Meringue Buttercream and use dark brown sugar instead of granulated sugar and use caramel flavoring instead of vanilla extract.  Here is a link to the recipe that I use - Woodland Bakery's SMBC.

Use the buttercream to frost between the layers and crumbcoat.  Put the cake in the refrigerator to chill the frosting for about 20 minutes, then you can give it a final coat of buttercream.  Put it back in the fridge for the final drizzle of caramel sauce.  The buttercream needs to be very cold and firm because the caramel will be quite warm when you pour it on the cake.

Caramel Sauce

The Caramel Sauce recipe comes from Sussie's of Mississippi, a bakery that I believe is not in business anymore.  The recipe was published in Taste of the South magazine.  I have halved it.

***Warning***  Caramel Sauce is very hot and may bubble up.  It will burn!  Please be very careful.  

You will need:

1/2 cup butter (1 stick)
1 cup packed light brown sugar
1/4 cup buttermilk
1/2 tsp. baking soda
1 Tbsp. white corn syrup
pinch of salt
1/2 tsp. vanilla extract

In a large saucepan, combine all ingredients.  Cook over low heat on stovetop, stirring until ingredients are dissolved.  Cook mixture until it reaches around 220-225 degrees.  Take it off the heat and stir periodically until it is cool enough to pour on your cold cake.

If you do not want to make your own caramel sauce, use a pre-made bottled caramel sauce or butterscotch.  This cake was made with Dark Brown Sugar in the caramel sauce and produced a very dark color.


9.25.2013

Coca-Cola Cake

Coca-Cola Cake

Lately, I have been testing several dessert cake recipes.  I am specifically interested in testing and/or developing "go-to" recipes for classic southern cakes.  I have a great buttermilk cake recipe to share with you in the next couple of weeks but today, I am going to share a recipe for Coca Cola Cake.


Coca-Cola was invented in Atlanta, GA.  Coca-Cola (better known as "Coke") is the most popular carbonated beverage in the south.  In fact, we pretty much call all soda pop "coke" even if it is a Pepsi product.

Coca-Cola Cake Recipe

This recipe comes from a "Southern Living"  cookbook and is pretty easy to make.


For the cake, you will need:

1 cup of Coke
1/2 cup buttermilk (room temp)
1 cup butter (room temp)
1-3/4 cup sugar (12.25 oz or 346.5g)
2 large eggs (room temp)
2 tsp. vanilla extract
2 cups all-purpose flour (9 oz or 254g)
1/4 cup cocoa (.75oz or 21.25g)
1 tsp baking soda
1-1/2 cups mini marshmallows

Prepare a 9x13 pan by buttering & flouring or use a homemade cake release like I do.  It's just equal parts of vegetable oil, flour and vegetable shortening mixed together.  Brush into pan so cake won't stick.  Since this is a "non-decorated" cake, I baked it in a disposable cake tin.  They are flimsy so I placed the entire tin inside of my normal 9x13 to add stability so it would be easier to pick up.  You could place it on a sheet pan instead.  I use a stand mixer, but you can use a hand mixer.

Preheat your oven to 350 degrees.  Pour your coke and buttermilk into a bowl or cup and let it stand.  Crack the eggs into a bowl and add the vanilla extract to them. Combine the flour, cocoa and baking soda in a bowl and whisk together to combine.

Put your butter into the mixer bowl and cream it on low (stopping to scrape down
bottom and sides as needed).  Slowly add the sugar and continue to cream 4-5
minutes until your mixture is light & fluffy.  I usually have to stop a couple of times to scrape down the sides and bottom of the bowl.


With the mixer on low, add the eggs one at a time, making sure the first one is incorporated before adding the second.

Now, you are going to alternate adding the flour mixture and the coke-buttermilk mixture (starting & ending with the flour mix).You do this by adding about 1/3 of the flour mix, then 1/2 of the coke-buttermilk, then 1/3 of the flour mix, then rest of the coke-buttermilk, then rest of the flour mix.  Once you start adding the flour, only mix it long enough to blend the ingredients.  Mixing the flour too long will make your cake tough.

Add your marshmallows and blend by hand.  Pour into your pan and bake at 350 degrees for about 30-35 min. (**Note:  I had to bake this cake for about 50 min - I think it took much longer because of the double pan I had it in).


Coca-Cola Cake Frosting

After your cake is done and it is cooling, you can make your frosting.  DO NOT make this frosting ahead of time.  It will not pour correctly if it is too cool.

For the frosting, you will need:

1/2 cup butter
1/3 cup coke
3 Tbsp cocoa
16 oz powdered sugar
1 Tbsp vanilla extract

Put the butter, coke and cocoa in a heavy saucepan and bring to a boil, stirring until the butter melts.  Remove from the heat and add the vanilla, then whisk in the
powdered sugar.  I normally sift my powdered sugar but I don't think it's necessary for this icing (I just do it out of habit).  Keep whisking until smooth but don't let it cool too much or you won't be able to pour it.  Pour on top of your warm cake.


This cake is really good if you warm it a bit and serve with a scoop of vanilla ice cream!

9.13.2013

Now That's a Chocolate Cake

Now That's A Chocolate Cake

Recently, I have been exploring the world of dessert cakes.  Unlike the decorated cakes that I normally make, dessert cakes usually don't have any fancy piping or writing on them.

I follow Gretchen Prices's Blog, Woodland Bakery, and when I saw her "Tower of Death Cake" I knew I had to make it (or a version of it).  Go to the Woodland Bakery blog to see a video of how she makes this cake.

I learned several valuable lessons while making this cake that I am going to pass on so if you give it a try, you will know what to do and what NOT to do.

Preparing the Cake

You can start with any chocolate cake.  Gretchen has a recipe on her site, but I just used my regular chocolate cake recipe.  You could even use a box mix, but you would probably need 2 mixes for this cake.  I made mine in 3 pans that are a little more than 8" in diameter.  The thing is you need 6 layers of cake.  If you make 3 layers like I did, just cut each layer in half.  If you make 2 layers, you will have to cut each layer into 3 thin layers.  Before I cut
my cake layers in half, I "leveled" them.  All that means is I took a little bit off the top of the cakes so they would be flat and level.  Here's what they look like when they are leveled.


That contraption in the background is a Wilton cake leveler.  This one had been stored in a cabinet for a long time because I didn't like the way it worked UNTIL I saw a youtube video on a different technique for using this leveler.  I love it now - glad I didn't throw it away.  Here's the tutorial video: How to level a cake  I used that same technique to "torte" - a fancy way of saying I cut each layer into two.

Next, you want to prepare a cake board.  Since I knew this cake would be traveling about 1 hour away, I wanted to make sure it did not slide off the cake
board so I "nailed" it to the board.  To do that, all you do is smear some of your icing on the board before you put your first layer down.  The icing acts as a glue to keep your cake from sliding off.


Stacking the Cake


One of the unique things about this cake is that it is filled with alternating layers of cream cheese icing and chocolate.  Now, in the original cake by Gretchen, she uses chocolate ganache as her chocolate filling.  I used regular chocolate buttercream.  You start with a layer of cake - then a layer of cream cheese icing.  Then another layer of cake - and a layer of chocolate icing.  Then another layer of cake - another layer of cream cheese icing and so on until you get to the top.


Now, here is where I will do something different next time.  Gretchen used a pastry bag to pipe her fillings in.  I always just spread it on like I am icing the cake so that is what I did.  Don't do that!  These layers of cake are very thin and easy to tear when you are trying to ice them like that.  It will be a lot easier to level the whole cake and make sure the sides are straight if you use the pastry bag to pipe in the fillings.


By the way, since these layers are so thin, let me show you how I picked them up and place them on the cake without them breaking into crumbs.  I used a cheap,
plastic cutting board to transport these things.  Unless your cake is frozen and stiff, you probably need to use something like this to help you keep them from falling part.


So, at this point your cake is filled and stacked.  You must place it in the refrigerator before you ice it.  With all these thin layers, if you tried to ice it now it would just move around and fall apart on you.  I place mine in a covered cake carrier and put it in the fridge overnight.  If you have the time, a couple of hours is
all it needs.  When it is sufficiently cold and pretty "solid", just ice it in chocolate buttercream.  Gretchen iced hers very thin, but since my cake was "wonky", I iced it with a thicker layer of chocolate buttercream.


Then - back in the fridge.  Your cake needs to be very cold when you pour the ganache on it.  I kept the cake in the refrigerator until my ganache was ready to pour on it.

Making Ganache

To make the ganache, just mix equal parts (by weight) of heavy cream and baker's chocolate.  Here is what I used:
Chop the chocolate up into little pieces.  Heat the cream until you see bubbles.  Have the chocolate in a bowl, then pour the hot cream over it.  I like to let it set for a minute with a towel over it.  Then whisk it with a wire whisk until smooth.  This will need to sit a little while to thicken up.  The longer it sits, the thicker it will become.  Couple of things I would do different this time - make more ganache.  Since I wasn't using this as a filling, I didn't make as much as the Gretchen's recipe called for.  I should have made more than I did (I used 8 oz. of each).  The 8 oz. really wasn't enough to sufficiently cover the cake.  I used bittersweet chocolate which balanced out the sweetness of the other icings used in the filling and the cake itself.

Also, next time I make this cake, I will not let the ganache get as thick before I pour it.  I was worried it was too thin so I let it sit and every once in a while, I would give it a stir with the whisk.  Once it cooled, it started to thicken quicker and when you pour it on a very cold cake, it pretty much solidifies.

To cover the cake in ganache, I just put the cake on a cooling rack and then put that in a sheet pan (to catch the ganache that flowed off the cake).  Start pouring on the top of the cake, using a spatula to help move the excess off the top and down the sides.  Put it back in the refrigerator to harden up.

I added a little flower made of fondant to the top of mine (the decorator in me just couldn't resist).  The best part about this is that the people I made it for loved it.  Comments ranged from its "sinfully delicious" to "best chocolate cake I've ever had".

9.11.2013

Cake Competitions at 2013 Delta Fest Fair

Cake Competitions at 2013 Delta Fest Fair

Had a great time at the Delta Fest Fair at the Agricenter in Memphis, TN on September 7, 2013.  One of the main reasons I went was to attend the West Tn. Sugar Arts Show.

There was actually 2 cake decorating competitions going on at the fair, the Fair cake competition as part of their art and crafts exhibits and the 2nd annual West TN Sugar Arts Show.

The Fair competition requires that the top tier (if more than one tier) be real cake while the bottom tiers have to be fake - most people use styrofoam.  These cakes are judged on taste, decoration and originality.  Here are some of this years entries:

I entered some cakes in the Mid-South Fair competition many years ago.  I believe I won 3 ribbons.

The other competition was the Sugar Arts Show.  This is strictly a cake decorating competition - no real cakes.  I have never entered one of these contests but may try in the future.  These type of competitions usually have a theme on which you have to base your design.  This year, the theme was "Pinterest".  The artist had to use pictures from Pinterest in their design.  Part of the requirement was to print out their inspiration pictures from Pinterest and have them on the table next to the cake.  

There were truly some AMAZING works of art displayed.  I am listing the names (as they were listed on the attached exhibit cards) to give credit to the cake decorators.

1.  Velma Campbell
2.  Melba Seymore
3.  Kaitlynn McDonald

4.  Karen Brown
5.  Dehmjisha Sigee
6.  Alice Espinosa

7.  Shannon Taylor
8.  Debra Bittle
9.  Cynthia Zoesch
10. Mariechen McGruder

  
11.  Kiersten McDonald
12.  Kari Osborn
13.  Fiona Yanok

8.12.2013

Wedding Cake Trends in the Mid-South for 2014

Wedding Cake Trends in the Mid-South for 2014

When I was young(er), the newest fashion trends always started in Europe, then spread to the east and west coasts of the U.S. before gradually making their way down to us in the mid-south states (TN, AR, MS) a few years later.  The explosion of the internet has shortened that delay somewhat.

Here are a few of the current and upcoming trends for wedding cakes in the Mid-South area:

Colors

Pink and Grey is one of the new popular color combos to make its way onto the wedding cake table.

This small two-tiered cake is covered in fondant and decorated with a pale grey fondant ribbon around the bottom of each tier with a multi-tone pink flower decoration.


One color that we are expecting brides to go crazy for this spring is mint.  Mint is that shade of pale green that is really just a whisper of green.  Some of the cake decorators in the San Francisco area are already getting requests for mint to show up in some form on the wedding cake.


One of the more popular color combos from the past couple of years is going to be
just as popular next year, as well.  

Yellow and Grey is a sophisticated color combination that is likely to be requested by brides for both afternoon and evening weddings.


This cake also displays another one of the wedding cake trends that has found favor in recent years - geometric designs.


Geometrics


This competition display cake exhibits both the pink and grey color scheme combination as well as the hottest geometric trend - chevrons.


Chevrons are hugely popular in the Mid-South right now and are expected to remain trendy for wedding cakes in the coming year.


*This cake is not my work - I was unable to determine who the decorator is in order to give proper credit.


Vintage Lace


On the other end of the design spectrum, the timeless look of vintage lace never goes out of style.  This beautiful four-tiered cake design by Tracy James of  Cotton and Crumbs in the U.K. is certain to delight the bride who envisions a wedding of romance and simple elegance.


Naked Cake

As far as I can tell, the Naked Cake sensation began with a celebrity's (Hilary Duff) wedding in 2010.  It took a little while to catch on in the "real" world but has been gaining in popularity since early 2012 and is finding it's way to the Mid-South area.

The Naked Cake seems very simple to make, but it is actually difficult to execute properly. Because there is no outside covering of frosting, the cake layers must be perfect.  The Naked Cake is well-suited for a smaller wedding in a casual setting.

This cake by Charmaine Capener of By Charmaine in the United Kingdom is one of the prettiest Naked Cakes I have seen.  (Take a minute to click on the link and "like" her facebook page).

If you are considering one of these cakes for your wedding, please don't attempt it yourself unless you are an experienced baker.


Dessert Table with Cake Assortment


Some couples have decided to forego the single wedding cake and opt for a dessert table with an assortment of cakes in various sizes and flavors as well as cookies, pies and other sweet goodies.  The dessert table option works well in an informal setting, but could be adapted to a more formal display as well.


If you decide to use this idea for your wedding, you may wish to "upsize" the number of servings compared to a traditional wedding cake.  A number of your guests will likely want to sample a bit of everything on the table.


The best trend we see (and are likely to see in the future), is that wedding couples are having  their cakes designed to suit their individual personalities.  If you envision a traditional white cake with smooth icing and flowers, then your wedding will have an understated elegance.  If you prefer a pumpkin spice cake frosted in bold colors with a geometric design, then go for it.  Some trends may come and go, but individuality is one trend that should never go out of style.


8.07.2013

Hi - I'm Pam and I am a Baking Geek (part 2)

In PART 1 of this post, I talked about 5 general "things to know" when it comes to baking, especially baking cakes.  In part 2, I promised to go over the purpose of the key ingredients in cake recipe.  Key ingredients are:  flour, a leavener, sugar, eggs, and butter.


1.  Flour:  Flour is what gives the cake structure.  I have written quite a bit (probably more than anyone else wants to read) about flour.  For all you need to know about flour, see PART 1 and Flour Power.  The only other thing I need to add is not to overmix your batter.  When you mix flour with a liquid and beat, it forms gluten. An overmixed cake batter will result in a tough cake because it developed too much gluten.

2.  Leavener:  Leaveners (baking powder and/or baking soda) is what makes cakes rise.  They are not the only ingredients that cause the cake to rise, but they are the primary way.  Unlike yeast, which produces carbon dioxide bubbles in the presence of sugar to create rise in breads, baking powder and/or soda just expands the bubbles that already exist in the batter.

What's the difference between baking soda and baking powder and are they interchangeable?  No - baking soda needs an acid to act (like citrus, buttermilk, molasses, honey or chocolate).  Baking powder is activated when it comes into contact with liquids and again when heated.

To make my cakes rise a little more, one of the things I do just about every time I bake a cake is to create a parchment "collar".  This process is explained in a post a wrote last year, You've Got Wring Around The Collar.

3.  Sugar:  Now, we all know sugar makes the cake sweet, but that is not it's only purpose in cake baking.  It also breaks up the gluten (from the flour) to help make the cake tender.  Sugar also helps make the cake moist by trapping the liquids.

4.  Eggs:  Eggs help bind the ingredients together and set the cake batter.  When exposed to heat, the proteins in egg whites uncoil and help the cake to rise.  The
yolks gives the cake a rich flavor and helps to keep it moist.

5.  Butter:  Butter (or oil or shortening) help tenderize the cake by keeping the flour from forming gluten.  Oils do a better job of it than butter does, but butter produces a better flavor.

While I hope these posts about the science of baking help to "demystify" the process, I highly recommend Gretchen Price's blog - Woodland Bakery (be sure to check out her YouTube videos, too).