Christmas Tree Petal Cake Tutorial
This Christmas themed birthday cake has a number of steps but is not difficult to make. I suggest making it in stages. Bake the cake one day and after it cools, "crumb coat" it and let it set overnight. Decorate it with the petal technique and make the marshmallow Christmas tree the next day.Baking the Cake
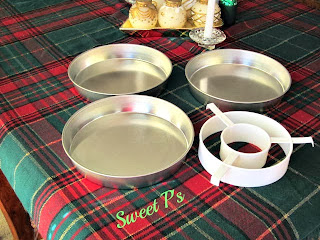
There is a "surprise" inside.... The cake is green and red checks. I have a set of pans to make checked cakes. You can probably find them in kitchen gadget stores or Amazon. Here is a pic of mine along with the contraption that separates the
batter:
Any cake batter will work for this cake but you need at least 7 cups of cake batter. I had 7 cups but 7.5 would be better. I separated the batter unevenly into 2 bowls - one at 3 cups and one at 4. You'll see why in a minute. I colored one bowl red
and the other green. Dark colors are hard to achieve without a lot of color. I used icing gel colors. To get red, I first colored the batter pink then started adding red. You usually end up using less color this way. The more color you have to use, the greater the chance it will change the flavor (and not in a good way).
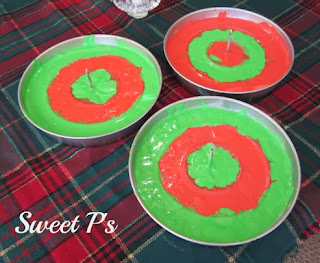
The hardest part of this cake is getting the batter into the right compartments
without creating a big mess. I usually use a spoon to help guide the batter where I want it to go.
One of these things is not like the other...Remember that we separated the batters unevenly? Here's why. In my cake, two of the layers use more green than red so I end up using a little more green batter than red batter. Wondering what those pointy things are in the middle of my cake? Here's an explanation..."Ring Around The Collar" post.
Here's what my cakes looked like when I took them out and turned them onto a
cooling rack:
Stacking
When you put them together, the "odd" one out goes in the middle. Put them together with icing in between each layer. Then ice with a "crumb coat" which is a thin later of frosting that keeps the crumbs from showing up on the finished surface of the cake. (I will share the icing recipe that I used for this cake at the end). Canned frosting is generally too soft and gooey to use for decorated cakes. If you don't have these special pans and don't want to purchase them, here's a link to a tutorial for an alternate method: Check cake by carving
Decorating with the Petal Technique
On to decorating... After the cake has set overnight, I filled 3 disposable icing bags with round tips #12. One with white frosting, one with red and one with
green. You will need lots more white than either red or green. I decorated this cake using the "Petal" technique. I use my small offset spatula to do this but you can use a butter knife or the back of a spoon. You will also need paper towels. Before I started on the sides, I finished frosting the top and smoothed it out.
The petal technique is a bit time consuming but Very easy and looks great! Start by piping a vertical row of "dots" or "blobs" starting at the bottom and working up to the top. The number of blobs you pipe will depend on how tall your cake is. Once your first row is piped, go back with the spatula and smash them. You will need to periodically clean your spatula (hence the paper towels) between smashes, especially when moving from one color to another. Here's a few pics to help you see what I am talking about:
Since I don't do videos, I am putting in a link to a youtube video that shows how easy this technique is: Petal video

I decorated this cake mostly in white with a few green and red "petals" for accent but you could do it all in one color or do a little math and create a pattern with the colors.
Here are a few different variations of this design I have done in the past:
Marshmallow Tree Decoration
The Christmas tree decoration on top of the cake is made from an ice cream cone, mini marshmallows, colored sugar, and icing. I placed the inverted ice cream cone on top of the cake first in order to anchor it as this cake had to travel about 45
minutes. I then used my white icing in a pastry bag fitted with a star tip (but a small round tip would work) and piped icing onto the cone. I worked in sections so the icing would not dry before I could get the marshmallows on. If you just wanted to make the tree decoration without making the cake and icing, you can use ready made icing as the glue to secure the marshmallows. I suggest using a ready made cookie icing because it will dry harder and faster.
The "branches" are mini marshmallows that have been cut in half (with scissors) diagonally. When you cut them, the cut side is sticky. You take the sticky side and coat with colored sugar. Here is a youtube video of this technique: Tree video
The guy in the video made his colored sugar but I already had some on hand. Next time, I will add some more color to mine to make it darker. Also, his looks a lot neater than mine. I lost track of my "rows" at some point. After I was 2/3 of the
way done, I realized that it was easier if I flattened the marshmallow just a little (on its side) before I cut it. I tried shaking them in a bag at first like he does, but I had a problem with mine sticking together so I just put my sugar in a dish and dipped the cut side of the marshmallows in it.
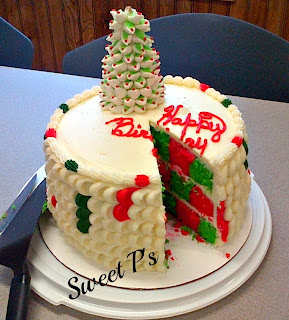
Remember the checked pattern inside? Well, here is what is looks like when the cake is cut -
Here's the recipe for the icing I used on this cake. It is Edna De la Cruz's recipe for cream cheese buttercream:
1/2 cup high ratio shortening*
1/2 cup (1 stick) butter - softened
8 oz. full fat cream cheese - softened
2 lbs. powdered sugar - sifted
1 Tbsp vanilla extract
1/2 tsp. salt*
* You can omit the shortening and use all butter or sub out Crisco for high ratio if you can't get high ratio. It may act a little different without the high ratio.
* I use popcorn salt because it has a much finer grain.
I put the butter and cream cheese in my mixer and mix until blended and smooth, then add the shortening and mix a few more minutes. I add the powdered sugar (along with the salt) in batches until it is fully incorporated. Add the vanilla extract and thin with half and half if needed. I usually add a tablespoon of half and half. You can add water to thin for various decorating techniques.


.jpg)


