Showing posts with label buttercream. Show all posts

3.04.2016

Bridal Shower Cakes and Mike McCarey

What in the world do bridal shower cakes and Mike McCarey have in common?  Well nothing, really.  Except that I had the chance to use his buttercream recipe on a couple of bridal shower cakes that I made recently.

In case you saying who???  Let me start off by saying that Mike McCarey is probably my favorite cake decorator/instructor.  He owns Mike's Amazing Cakes in Redmond, WA and has been on several cake challenge competitions.  He is especially known for his 3-D sculpted cake masterpieces.  He also teaches several cake classes on Craftsy.  I highly recommend his Craftsy classes.

Bridal shower cake
Anyway, I had a chance to use his unique buttercream recipe on this bridal shower cake recently and I loved how creamy it was, the taste, texture and workability.  The recipe calls for pasteurized egg whites, powdered sugar, vanilla extract, and butter....lots and lots of butter.


Mike uses this buttercream as a base for all his amazing sculpted cakes so I thought I would give it a try under a simple fondant covered round cake.  I didn't take into account the humidity factor where I live.  In Mississippi, it is pretty humid all year round.  Even though I didn't have any problems rolling out my fondant, when I started to put it on my chilled cake, the condensation-humidity factor kicked in.  I could barely get the fondant attached to the cake before the condensation on the cold buttercream started to make the fondant extra sticky.  I couldn't even smooth it.  I had to wait for all the condensation to dry before I could touch the cake again.  Unfortunately by that time, the buttercream had become soft which renders this technique useless as it relies on a hard buttercream to help make the fondant smooth.

bridal shower cake
I still like the way it turned out, but I wish the buttercream would have stayed firm enough for me to get it smoother.  The bottom layer is my standard bakery icing in hot pink and the top is black fondant.


So...my conclusion is that this would be a great buttercream for a filling and perhaps as frosting (when the weather is not too warm) but I don't think I can use it as a base for fondant due to the condensation factor.  I am pretty sure that chocolate ganache is what I am going to have to use to get around the refrigeration-condensation issue.

Here are a few more bridal shower cake ideas:

bridal shower cake


bridal shower cupcakes


Senatobia MS cakes

bridal shower cakes


2.24.2016

Naked and Semi Dressed Cakes

The "naked" wedding cake trend has been around now for a few years and it is increasing in popularity, at least in my area.  So some of you may be asking what is a naked cake?  It is called naked because it is un-iced.  There is usually some type of buttercream or filling between the cake layers but the top and sides remain un-iced.  Most of the time, the cake is decorated with fresh flowers, fruit, or both.

I actually like these cakes because I think they are lighter and less sweet.  One thing to keep in mind is that icing also serves to help keep the cake from drying out.  One thing I like to do when making these cakes is brush the layers and tops with a gelatin-sugar mixture that helps seal the cake and keep it from drying out so fast.

There are many variations of the naked cake.  It can be simply a naked cake with
naked wedding cake
a sprinkle of powdered sugar.  This one only has buttercream frosting between the cake layers and it does not extend onto the sides of the cake layers.


naked wedding cake


Another way to make a naked cake is to apply a kind of spackle effect.  On this one, I piped extra icing in between the layers and then used my bench scraper to swipe the excess onto the sides of the cake.


You may notice on the cake above, I piped a scalloped pattern of buttercream on the very top.


Finally, there is a semi-dressed or semi-naked cake.  On this cake, the sides are
naked wedding cake
left unfrosted, but a design is piped on.


These naked cake designs work especially well for a rustic-themed wedding.  If you are getting married in the northwest MS area and like the look of these naked and semi-naked cakes, I would be happy to discuss the options with you.

8.22.2014

Stack of Books Cake

Stack of Books Cake

When my aunt decided to throw a party for my uncle, her and my cousin for their milestone birthdays, she asked if I would make the cake.  Of course, I said yes then I brainstormed about a design that would incorporate birthdays for three different
Senatobia MS cake
people.  The design I came up with was a stack of books with a title on each that reflected something about the person.


book cake


My uncle will be 80 this year and is known for having a story on just about everything.  My aunt is a blonde and hit 70 this year.  My cousin, who turned 50 in June, loves all animals and has a special fondness for cats.


I decided to poke a little fun at the birthday celebrants:
buttercream book cake


I sacrificed a bit of cleaness in the design because I really wanted these cakes to be iced in buttercream instead of fondant.  Before I started, I did some research into how to get a more realistic looking book cake while using buttercream.  
MS book cake


Before this cake, the only book cake I had made was an open book cake.
open book cake


I am especially happy with how my cake board turned out.  I covered it in fondant, made distress marks, scored it with a ruler and then airbrushed it to look like a wood floor. 
Senatobia MS cake

We had a great time at the party and I got to see old friends and family that I had not seen in a while.


8.02.2014

Frozen Buttercream Transfer Tutorial

Frozen Buttercream Transfer Tutorial

There are a lot of frozen buttercream transfer tutorials on the internet.  Google it and you will find several on blogs and on youtube.  So, why am I adding my own to the mix?  Well, why not?  In this tutorial, I will show why I like using FBCTs and address some of the issues I have had using them.

A frozen buttercream transfer is a relatively simple technique that allows for a picture and/or logo to be placed on a cake.  I enjoy using them because I am terrible at drawing and this technique allows me to "draw" a picture on cake.  Just takes a little patience and care.

frozen buttercream transfer
I used the FBCT technique on these cakes in order to get the school logo and/or mascot.


Supplies Needed

You will need:
  •  a flat surface on which to tape your pattern to that you can also pipe on and transport to and from the freezer.  It can be a cookie sheet, cake cardboard, glass, etc.  I like to use a piece of acrylic that I purchased at a hardware superstore.  
  • something to pipe on.  This can either be wax paper, parchment paper or acetate.  I prefer to use clear acetate because it is easier to view the pattern underneath, but I have also used wax paper.
  • a piping bag filled with a medium to medium-stiff icing that you want to use as an outline color (most of the times this will be black).  NOTE:  You can do FBCT without an outline but is is easier to have an outline. 
  • piping bags filled with a medium to thin icing to fill in.  These will be all the colors you use for your pattern.
  • various sizes of round (writing) tips.  The size depends on the level of detail you are trying to achieve and the area (size) that you have to cover.
  • art brush or toothpick to move icing into corners and missed spots.

Preparing Your Work Surface

FBCT tools
Take your pattern (a coloring book page, image found on the web, party invitation, etc.) and prepare a mirror image.  If your image is on the web, you can easily flip the image.  If your pattern is a coloring book page or invitation, you can use a copier to reverse the image or you can trace your pattern onto parchment paper then flip it over.  If you don't start out with a mirror image, your FBCT will turn out flipped horizontally from your original.  This may not be a big deal except if you have writing on your image.  The more detailed and the more colors that are in your picture, the harder it will be to pipe cleanly.  In this example, I took a permanent marker and went over the outlines to help them stand out even more.

Once you are happy with your pattern, tape it to your flat work surface.  If you are using a cookie sheet, tap the pattern on top of it.  If you are using a clear surface like glass or plexiglass, you can tape it to the underside.  Next, tape your wax paper, parchment or acetate to the top of the pattern. NOTE:  Before you start piping, make sure your flat work surface will fit in the freezer.

Piping the Outline

FBCT outline
If you want to tint your own icing black (or whatever outline color of your choosing), feel free to do so.  However, if I am using black I generally will use a pre-made black icing because it is very difficult to get a true black icing on your own.  In the picture above, you can see where I used a tube of black icing- this is more like royal icing and not buttercream.  I cut the "seam" end of the tube off, scoop it out and put it in a bowl, and thin it to the consistency that I want. Once the out line is done, I put the transfer in the freezer to harden the outline.

Piping the Inside

FBCT
Couple of things to keep in mind as you pipe the rest of the design.  

It's generally easier to pipe from the middle out so you minimize the risk of dragging your hand in what you have already piped.

You must keep in mind that this image will be "flipped" so you are looking at the backside while you are piping.  This requires that you pipe any details that are "in front" first.  This includes any highlights (like this image had highlights in the sunglasses that I needed to pipe before filling in the black part of the glasses).

You will use smaller tips for little details and filling in tight spots and bigger tips for filling in large areas.  Remember that stiff icing will be very difficult to pipe through a small tip.  It may be tempting to pipe lines back and forth to cover the spaces but the image will look better if you can keep the tip inserted in the icing as you pipe and use a little circular motion.  When you use very small tips (1 or 0), you may get bits of icing sugar stuck in the opening.  This is why I like to use couplers with small tips.  I can easily screw the coupler off, unclog the tip and put it back together.

FBCT
Once you have piped one color or area and before you start on the next color, place your transfer in the freezer for a few minutes to let icing firm up.  This makes it so much easier to get clean lines without the colors inadvertently mixing.

From time to time, check your piping from the front side to see if you missed any spots.  There will usually be tiny areas that the icing did not get into.  Take a small paintbrush or toothpick and gently coax icing into those spots.  

FBCT back
When you are satisfied with how your design looks, put it in the freezer to harden.  Remember, you are looking at the "back".  This side will be against the cake.  


Once it is hard enough where you won't mess it up, pipe a layer of icing on the back (the same color as the icing on your cake) and smooth it over with a small spatula.  This adds stability.  Try to get this icing as smooth and even as possible.
 If there are high and low spots, your transfer will have dips (and may even break) at the low spots as the icing thaws once it is on your cake.  BUT, be aware that the thicker your transfer is, the higher it is going to stand up off your cake.  Personally, I like to use a small, tapered spatula to smooth out the back.  Place it back in the freezer one last time.  At this point, I usually take off all the tape that had been holding my pattern in place.  I want to get it on the cake as soon as possible after it comes out of the freezer and I don't want to be fumbling around with the tape.

Placing it on the cake

After your transfer has sufficiently hardened, it is time to place it on your cake.  The amount of time it stays in the freezer is completely up to you.  I have left them in there as little as 30 minutes or as long as overnight.  However, once you take it out, it will start to thaw immediately so you need to work quickly.  Have your cake already iced and have pre-determined where the FBCT will be placed.  Take a quick look at your FBCT to make sure you have it oriented in the right direction.  Place it flat on your cake and gently press.  Peel off your wax paper or acetate to reveal your masterpiece.  If your FBCT is wanting to stick, put the whole thing (cake and all) back in the freezer to firm back up.  If you notice a lot of "lines" in the surface, wait until it has thawed, finished condensating and crusted a bit before placing a Viva paper towel or piece of parchment paper on it and gently rubbing out those lines.  You may wish to leave your FBCT like it is or place a border around it.

Here is the finished cake:


FBCT without border


FBCT with border


More examples of FBCT:


7.20.2014

Simple Buttercream Borders

Simple Buttercream Borders

Ever since I started decorating cakes, I have had this love affair with borders.  I know that sounds strange, but I love looking at buttercream borders on cakes.  To me, the border can really make a plain cake look special.

Since I don't do video, I want to share a couple of youtube channels where you can watch some very talented buttercream decorators.  The first one is Liz Larson.  Liz was a grocery cake decorator and shares a wealth of information on how to quickly pipe buttercream cakes.  The other channel is Roland Winbeckler.  Roland is a legend in the cake decorating world.  He definitely does things old-school. He has a few buttercream tutorials on his channel that are well worth watching.

Shell Borders

One of the simplest and most common buttercream border is the shell border (or some variation).  This border is done by holding your piping bag at about a 45 degree angle and letting your icing build up a bit before you ease the pressure and pull away. 

 Here is the shell border shown with a #18 tip and a #21 tip:
shell border

Shell border with #32 tip:
buttercream shell border

Shell border with #199 tip:
199 shell border


And with a #5 writing tip:
bead border


You see that the piping and pressure control are the same, but you get completely different looks depending on what tip is used.

Variations on the Shell Border

There are several things that can be added to a shell border to "jazz it up" a bit.

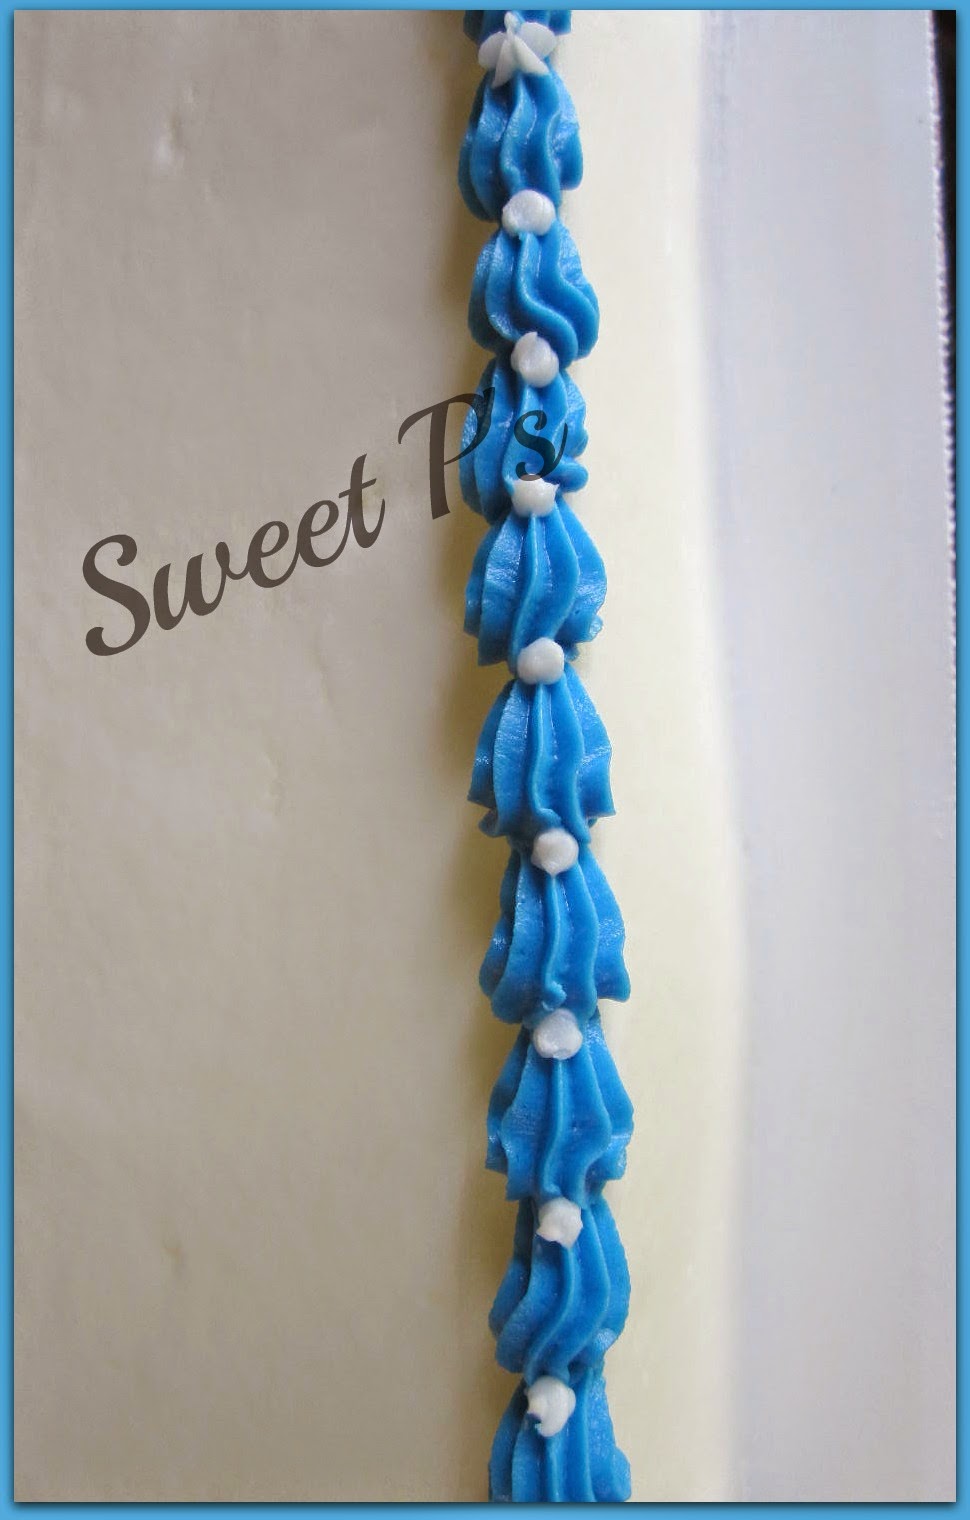
You can add a dot of a different color in between each shell
shell border with dot

or you can add a star:
shell border with star


You can do what I refer to as the "over-under" which is a line piped with a writing tube that goes over a shell, then under the next one, then over, then under, etc.  Then, go back to the first shell and reverse the order so that they criss cross:
shell border with lines

This works really well when you have 3 main colors that you can carry through to the border:
shell border

One way to embellish a bottom shell border is to pipe simple arches above them and on the cake board.  Here, I show a #199 shell border with arches piped with #18:
buttercream border


Once you are ready to move beyond the simple straight shell, try a reverse shell.  Start by piping a shell where the "puff" is curved to the right:
reverse shell

Then pipe the next one with the puff in the opposite direction:
reverse shell

Repeat:
reverse shell

A variation of this is the double reverse shell.  This is done by piping 2 puffs in one direction, then reversing:
double reverse shell

To take this one step further, pipe another shell on top of the double so it looks like a triple shell:
reverse shell


Other types of Buttercream Borders

The rope border is well suited for a basketweave cake, a western or cowboy themed cake, nautical cake or masculine cake.  I used a #32 to pipe this rope border.  Start with a loose backward "S" shape:
rope border

Then, place the tip under the curve of the "S" and pipe over the tail of the 1st one:
rope border

Repeat:
rope border


Two very simple borders are the Zig-Zag and Puff borders.  The zig-zag border on the top was piped with a #18 tip by keeping steady pressure and moving the bag back and forth along the top edge.  The botton Puff border is piped with a #32.  You make the zig-zag motion but start with easy pressure then build to heavy pressure in the middle and back to easy pressure to ease away.
simple buttercream borders


The leaf tip #70 makes a very pretty ribbon like border.  I made this border by using a shell-type motion but without building up a "puff".

The e-motion border is made pretty much how it sounds.  Take a star-tip (in this case #14) and keep steady pressure while you pipe in a motion like a cursive "e".
e-motion border


You can add to this with a row of dots above and below the e-motion border:
e-motion border with beads


Simple scroll design for sides:

This is one of the simplest scroll designs that I know of.  Start by piping a wavy line.  Make sure the waves are not too close together.
simple scrolls

Then, pipe a backward "c" in each curve:
simple scrolls

Then, go back over the "c" and use heavier pressure on the start of the "c":
simple scrolls

Then, go back and pipe extra embellishments to fancy it up:
simple scrolls


Examples:

Bottom Leaf ribbon border with dots - Top shell border:
buttercream cake Senatobia MS

Top Rope border - bottom shell border:
Easter Cake


Top Over-Under border:
buttercream borders


Bottom Puff border
puff border

Top border Reverse Shell:
reverse shell border