Buttercream Basketweave Tutorial & Easter Cake Ideas
Easter will be upon us very soon and I thought I would share some Easter cake ideas along with a mini-basketweave tutorial.
All of the above cakes were decorated with a buttercream basketweave technique on the side. This is a very simple piping technique that looks very complicated. The hardest part is getting the lines even but I will show you how to create a template to help with this.
Making the Template
Once you have your cake put together, the top fully iced and the sides crumb-coated, you need to create a template for the spacing of the basketweave pattern.
First cut a strip of paper (can be wax paper or freezer paper) the circumference of your cake. If necessary, tape several pieces together to get it to fit around your cake.
Then, fold that piece of paper in half.
Then, fold that in half, and keep folding in half until you have the size of spacing that you want.
See all those creases... each one of those represents where a vertical piece of my basketweave will go.
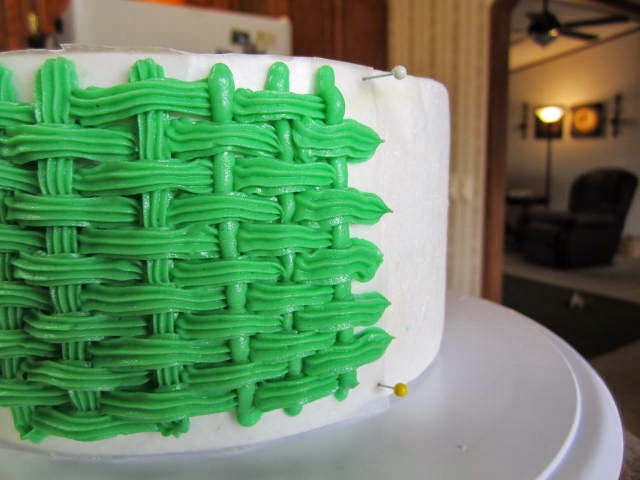
Take your strip of paper and "pin" it around the top of your cake. For purposes of
this demonstration, I used a styrofoam cake dummy but on a real cake, I use toothpicks to "pin".
Every place you see the crease that you made from folding the paper, make a hole in the top edge of your cake with a toothpick. This hole will be covered up by a top border. In the picture to the left, these holes are represented by the pins on the top edge.
Once you have made all the holes, you can take your paper template off.
Here are the 3 tips that I am going to use for this demonstration. The one of the left is tip #47 (basketweave tip). The one in the middle is a round tip (#5). And the one on the right is a star tip (#18).
Piping the Lines
The first step is to make a vertical line (from top to bottom) on one of the holes you make at the top edge of your cake.
Next, make short horizontal lines beginning at the top and just to the left of the vertical line you just made. These horizontal lines should extend over to your next "hole". Try to keep them spaced about the same width as your piping tip.
Next, make another vertical line on top of where your horizontal lines ended (at the mark of your toothpick hole).
Then, repeat the horizontal lines, making sure to extend just to the next mark. Try piping these horizontal lines so it appears they are "tucked under" the vertical ones.
Here is what is looks like with a round tip (I used #5). This look has more space between the lines so make sure you have your cake iced underneath it.
And, here is what the star tip basketweave looks like.
You can also combine two tips, using one for the vertical lines and another for the
horizontal. Here I have used a round tip for the vertical parts and the star tip for the horizontal.
Other Cake Ideas for Easter
A different look for an Easter theme cake is a multi-colored design (resembling the colors of Easter eggs).
Or, a floral design using spring colors.
All of these cakes are "Easter themed" in that they reflect the bunny, chicks and spring colors that we associate with Easter; however, the real reason to celebrate Easter is the resurrection of Jesus. I am not an overly religious person but I am a very spiritual person. These lyrics by the group Casting Crowns say exactly what I feel is the meaning of Easter:
Living, He loved me
Dying, He saved me
Buried, He carried my sins far away
Rising, He justified freely forever
One day He's coming
Oh glorious day, oh glorious day


Great idea for dividing up the cake evenly! Saves me from having another tool in my drawer!
ReplyDeleteThanks!